Friends, in this article, I will explain to you step by step how to create a beautiful and lovely birthday banner or birthday photo editing with your name and a good quotation as well as your photo. Read it completely and edit it. It will be very easy and attractive in HD. Read it completely.
The things you need for this photo editing are to gather some images.
- Background image.
- Stylish font style.
- Photo with person’s background removed.
- Make sure that Alight Motion and PicsArt are installed on your mobile.
How to remove a background in PicsArt.
- This application does not only remove backgrounds; it can also do complete photo editing. From background removal, every banner and every photo editing can also be done in this. Here are some basics for photo editing. Along with these skills, you should also have editing knowledge related to the PicsArt application. If you want an easy way to share your project with more options, Alight Motion will be handy for you. It will be very easy to edit.
- Open the PicsArt application click on the plus sign and click on the edit photo. Select a photo from the gallery. Now, after selecting that photo, scroll down to the bottom. On the right side, you will see a busy or background option. Click on it. When you click on this option, your mobile data should be on. Now the background will be removed in two to three seconds. If you do not remove anything properly, you can click on the eraser tool option on the left side at the top select the brush size and then remove the background manually. You can also remove the background in another way. First, you need to apply the background in transparency. Then click on the add photo and select your After adding the photo, click on the eraser tool at the top and click on the person option to remove the background. In this way, you can remove the background click on the sixth mark on the right side click on the tick mark click on the save option and save this photo to your gallery.
- If you want this photo in HD, after removing the background, click on the crop option, and there will be an AI option. Click on it, and you can convert your photo to HD and then save this photo.
Photo editing in Alight Motion
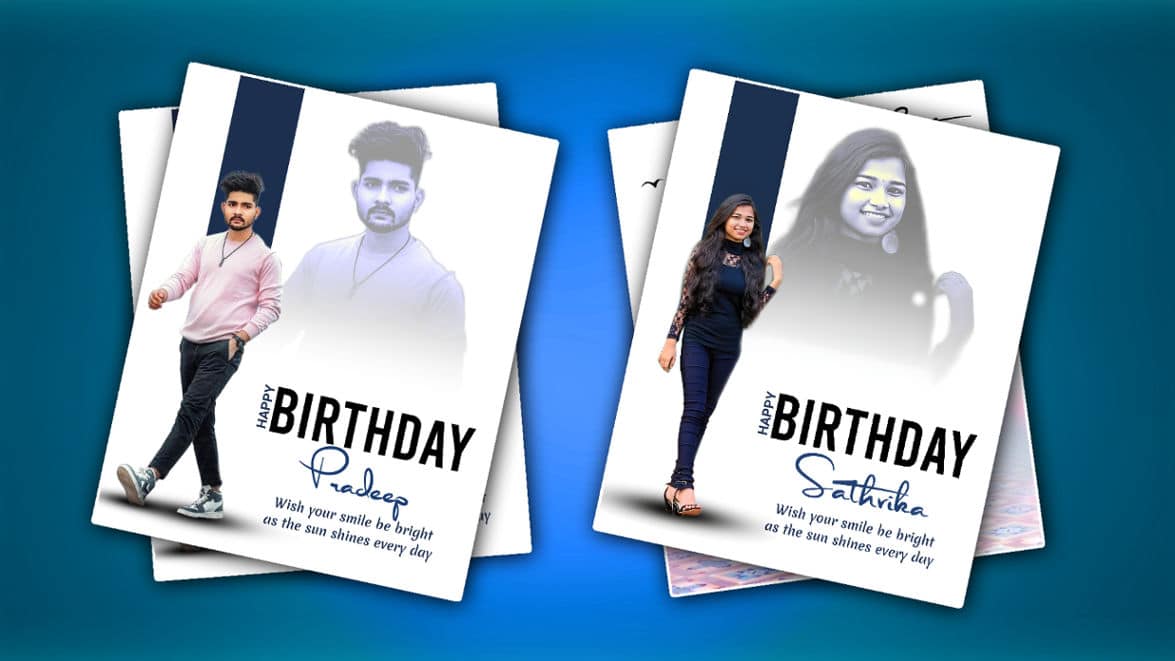
- For this, you open this application, click on the plus icon, select the project name and banner size, select the background in white colour, and click on the create option. It will go to the next step. Here again, you click on the green plus sign and click on the media option. You can remove the background from your gallery earlier. Select the personal photos you have taken and add them. After adding this photo, add it on the left side. When you add the photo, this photo should be full. The person should be a complete photo.
- Then again click on the green place second click on the shapes option select the rectangular shape and add it. Now extend this shape from the top to the middle part of the person on the left side. After setting this rectangular to the back side of the person, you need to change its colour. How do you change this colour? You need to change the colour of this shape according to the person’s colour. For this, you need to click on this rectangular shape layer click on the colour colour and fill option and use the paint option. Wherever you place the paint, it will takecolourcolor related to it. You can also colour the colour of your choice like this.
- After that, apply a shadow under this photo. To do this, you need to click on the plus sign and click on the gallery option apply the shadow effect from the gallery and apply this shadow to the bottom of the person.
- Now you need to add a text, Happy Birthday. For this, click on the plus icon and click on the text option. Here you need to type only Birthday and enter it. Enter it only in capitals. Then select the size take this text color block and then set this text a little above on the right side. Then duplicate this same text and make it smaller, and click on Edit Text and type Happy in it.
- Now set this text to Happy Birthday vertically on the left side.
- Then take another text apply a color to it and enter a name in it. Now apply a stylish font to it and add this name under the Happy Birthday text.
- Now take another text and take the same black colour and write a quotation related to a birthday here and set it on the right side at the bottom.
- Now you need to add another photo. Take only half of this photo. After taking it, you need to add only the photos with the background removed. For this, you need to click on the plus sign click on the MIDI option select this photo from the galleries and add it.
- Then click on this photo layer click on the effects option click on the add effect and apply the saturation effect from the store, in this you need to set it to 0%, that is, set it to black and white. Then come back and click on the branding and opacity option and set the opacity to 50%. Now come back again click on the effects option click on the add effect, and from the store again you need to apply the wipe effect. In this, you need to feather and craft from the bottom. Set this photo as the back side of all the photos, make it larger in size, and set it on the right side top. In this way, after we have done the dual photo editing, click on the share option on the right side click on the current frame ice PNG option and export it. Then click on the save option and save this photo to your gallery.
- You can save the photo like this again in the PicsArt application to HD or resize it and save the photo again. In this way, you can easily edit the dual Happy Birthday photo.
💠Font Click Here
💠XML Click Here
💠AM Presset ✅ Click Here
Varun
Wish you many many happy return of the day
This comment has been removed by the author.