Are you looking for a good video birthday wishes video for your friends, relatives, or relatives, in this article, I will explain step by step how to create a beautiful and easy birthday wishes video for status, read it completely. Edit it
Let’s gather some images and videos for this video
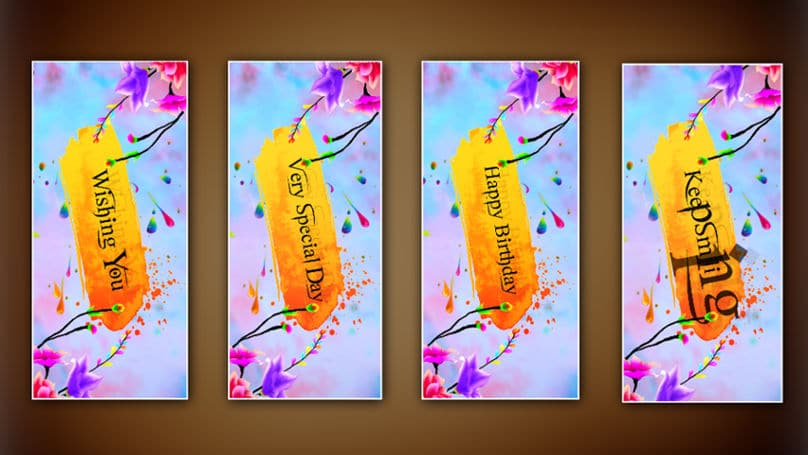
- White and blue color background image,
- Brushstroke PNG image,
- Ink drops PNG image,
- Pink and blue color flower PNG image,
- Stylish English Font,
- Brushstroke PNG image,
- Make sure that the Alight Motion application is installed on your mobile.
- Now open the Alight Motion application, click on the plus icon in green color at the bottom and select 16:9 ratio, project name, frame rate, resolution, background, and click on Create project below, the interface of Alight Motion will open.

- Now click on the green plus icon at the bottom on the right side click on the media option select a background photo from your gallery add it and drag this photo to four seconds.

- Once again, click on the plus icon click on the gallery option select the Ink Drops PNG image from your gallery, and add it. This image should also be dragged for four seconds.

- After setting this image in the center, click on the move and transform option and click on the rotate option to animate this image with the rotate option.

- Now again click on the same place icon click on media select the brush stroke PNG image from the gallery and add this image for four seconds also increase the color of this image rotate it a little and set it in the center.

- Now click on the plus icon click on the text option and take a text where type Wishing You and apply the font style to the text and also apply the color now click on the text move and transform option and rotate it as well.

- Now click on this text layer and click on add effect and add text transform, Raster transform, these two effects from Apex store and add animation.

- Now click on the pink and blue color PNG flower image on the plus icon click on media add this image from the gallery and add this image layer for four seconds then click on the move and transform option and rotate this image here.

- Also, click on this layer and click on Add Effect, type Fractal Warp from the effects store, select it, add it, animate it, and apply it.

- Similarly, click on this layer click on the Duplicate option duplicate this PNG image set one of them in the top right corner set the other one in the bottom left corner, and rotate and apply effects to these images too.

- Now click on the green plus icon click on the elements option add null and apply this layer for four seconds.

- Now select all the layers you have taken so far click on that layer click on the layer option at the top and select only the number corresponding to the slide where it is null. Only select

- Then click on the move and transform option and use the scale option to animate it.

- With this, the first slide is complete, the rest of the slides can also be created in the same way, for them, you can select and copy all the layers that you have added so far i.e. in the first layer or in the first slide and paste them in the next slide and edit them.

- Then click on the plus icon click on the audio option add a good BGM of your choice and set the fade-out apex for this audio.
- Now click on the share option on the right side top click on the video option and select high quality or 1080p, if it supports more than select the quality as high as possible and select the frame rate 30fps, click on the export option, and after some time save option Click on this save option, and you can save your video to the gallery.
Follow these points compulsively.
- While you are editing the video before doing it, you should import only the images and videos that you select, which are of high quality. After the editing of the video is complete, do not export directly. You play this video from start to end. You have to check and set everything in advance, by doing this you can easily bring a professional look to your videos. Because of these small mistakes you make, there are chances that you will lose the professional look or quality, so when you save the video, check the video first Save it.
- In this, you can use the camera option instead of the null option, or you can also edit using the group option. Using the group option reduces the quality of photos or videos By using the camera you can animate all the layers in one slide at once so we may not be able to animate the desired layer that’s why using this null option we can animate the layer we want as we like, and you can animate this null layer Even after applying when we need any more photos or videos, we can add extras and animate them. When we use the camera layer, we can’t do this.
- So far using only the processing I have mentioned you will be able to edit the video like I mentioned as a tease.
- In this alight Motion application, we can create professionally beautiful and colorful transitions with new effects as we like. In addition to these, there are many types of effects in this application. Start video editing only after learning these completely. You can edit more amount than expected, but many people don’t like to edit in this application because after opening this application all the options are a bit confusing if we know them completely they are very useful for us to edit very easily and sometimes this application may not support in some mobiles. Based on the version available on your mobile, only the relevant application version should be installed and edited.
💠Alight Motion Project Click Here
💠Font Click Here