Table of Contents
-
Introduction
-
What Is “Dual Photo Editing”?
-
Why Use AI for Dual Photo Editing?
-
Key Challenges & How AI Helps
-
Core Features to Look For in an AI Dual‑Photo Editor
-
Top Tools & Platforms for Dual AI Photo Editing
6.1 CapCut / Dual Photo Templates CapCut
6.2 Picsart & AI Tools Wikipedia
6.3 Luminar Neo Wikipedia
6.4 Retouch4Me (for portraits) Wikipedia
6.5 Other notable AI editors (Pixlr, Fotor, etc.) miramuseai.net+1 -
Workflow & Best Practices for AI‑Assisted Dual Photo Editing
7.1 Planning & Selecting Image Pairs
7.2 Preprocessing & Alignment
7.3 Prompting / AI Guidance & Masks
7.4 Fine-tuning, blending, and masking
7.5 Post‑processing & consistency checks -
Use Cases & Creative Ideas
8.1 Before vs After / Transformations
8.2 Portrait vs Environmental Context
8.3 Product photography comparisons
8.4 Artistic blending, double exposure style -
Limitations, Pitfalls & Ethical Considerations
-
Future Directions & Emerging Research
-
Conclusion & Recommendations
1. Introduction
In an era when visual storytelling commands attention, combining two images—whether to show “before vs. after,” contrast, or creative overlap—can generate striking and meaningful content. But doing this manually (masking, alignment, blending) is tedious and error‑prone, especially when the images differ in lighting, angle, colours, or resolution.
That’s where AI-powered dual photo editing comes in. With machine learning, generative models, and intelligent masking techniques, modern tools can merge, align, blend, and enhance two images with minimal manual work—while preserving realism.
In this article, we’ll explore what dual photo editing means, how AI enables it, key tools and workflows, creative ideas, limitations, and where the tech is heading. By the end, you’ll be able to plan and execute compelling dual-image compositions with confidence.
2. What Is “Dual Photo Editing”?
“Dual photo editing” refers to the technique of combining, comparing, or blending two separate images into one visual composition. Some common forms include:
-
Side-by-side before/after: One image left, one right, showing a transformation
-
Overlay / double exposure effect: Blending two images into one with transparency or masks
-
Morph/transition: Gradually transitioning one into another
-
Juxtaposition/contrast: Deliberately contrasting two scenes (e.g. old vs new, day vs night)
-
Composite pairing: E.g. inserting an object from one image into the other, or mixing elements
Dual editing is especially powerful for storytelling, visual impact, portfolio, ads, comparisons, and creative art.
When done manually, dual editing requires careful alignment, masking, colour matching, blending edges, and often manual retouching. AI simplifies many of those painful steps.
3. Why Use AI for Dual Photo Editing?
Here are some key advantages of using AI in dual photo editing:
-
Automatic alignment & registration: AI can detect common features and align images (even if taken at slightly different angles).
-
Smartmasking/segmentation: AI recognises objects (people, sky, buildings) and builds masks for blending.
-
Colour & lighting harmonisation: It can match tone, white balance, and exposure across both images to make them cohesive.
-
Inpainting/fill gaps: Where areas do not overlap, AI can smartly fill missing parts or smoothly transition.
-
Speed & efficiency: What would take hours of manual work can often be done in minutes.
-
Generative blending / creative styles: Some tools allow you to dictate how you want blending (e.g. artistic, dreamy, minimal) via prompts or presets.
-
Iterative feedback & refinement: Many AI tools allow you to adjust or “undo” parts while keeping the automation benefits.
Because of these, AI brings dual editing within reach of creators who aren’t experts in Photoshop masking or compositing.
4. Key Challenges & How AI Helps
While AI is powerful, dual photo editing is nontrivial. Let’s look at core challenges and how AI addresses them:
| Challenge | Why It’s Hard | AI / ML Solution |
|---|---|---|
| Alignment (perspective, rotation, scale) | Two shots may be taken from different angles, focal lengths, or camera positions.s | Feature‑matching algorithms, homography estimation, and image registration models |
| Object masking & edges | Separating foreground and background, smoothly blending paint strokes around hair/clothing | Semantic segmentation, edge-aware masks, transparency blending, trimap generation |
| Colour/tone matching | Images may differ in exposure, white balance, and dynamic range | Neural network colour harmonisation, histogram matching, and style transfer |
| Seamless blending | Avoid visible seams, ghosting, or harsh edges | Alpha blending, blending gradients, inpainting, multiscale blending |
| Filling missing areas | One image may lack parts present in the other | Inpainting with generative models or patch-based fill |
| Preserving realism / avoiding artefacts | Over-smoothing, blur, weird transitions, halo effects | Post‑processing filters, consistency checks, and user-driven corrections |
Emerging research also pushes boundaries. For example:
-
CannyEdit, a training-free method, uses “dual-prompt guidance” plus selective edge control to balance adherence in edited regions while preserving context in others. arXiv
-
PromptArtisan can combine multiple editing instructions in one pass with fine-grained attention control, enabling more complex dual edits. arXiv
These advanced methods hint at how future dual editing will become more robust, flexible, and intuitive.
5. Core Features to Look For in an AI Dual‑Photo Editor
If you are choosing or evaluating a tool for dual photo editing using AI, the following features are crucial:
-
Image alignment/registration module
-
Auto-detect matching points and align images
-
Support for slight rotations, scale, and perspective distortions
-
-
Intelligent masking/object detection
-
Recognise multiple semantic labels (sky, person, building, foliage)
-
User-adjustable masks / trimap edits
-
-
Colour harmonisation & tone matching
-
Tools to equalise exposure, contrast, and white balance across both images
-
Style transfer or blending presets
-
-
Blending modes & transition control
-
Gradient blending, feathered edges, mixed opacity
-
Creative blending (e.g. soft dissolve, hard cut, wipe)
-
-
Inpainting / fill missing areas
-
Smart filling in non-overlapping zones
-
Avoiding artifacts
-
-
Prompt/generative blending (text or style guidance)
-
Ability to issue natural language prompts for how to mix or style
-
Control of blending strength, style, and mood
-
-
Interactive adjustments & undo / mask editing
-
Ability to refine masks manually
-
Local corrections, brush-based corrections
-
Non-destructive editing
-
-
Batch / multi-image support
-
Work with multiple pairs or variations
-
Save multiple versions or layers
-
-
Export options & high resolution output
-
Support for raw, high-res formats
-
Layered exports (e.g. PSD) if manual tweaking later is needed
-
-
Performance, stability, and privacy
-
Local vs cloud processing
-
GPU support
-
Privacy of images / no unintended data upload
-
A tool that ticks most of these is well-suited for dual AI-assisted editing.
6. Top Tools & Platforms for Dual AI Photo Editing
Below are some of the leading tools—from general editors to niche plugins—that you can use (or adapt) for dual photo editing workflows.
6.1 CapCut / Dual Photo Templates
CapCut’s AI tools allow users to blend or compare two images side-by-side via dual photo editing templates. The UI offers intuitive transitions, blending options, and layout controls so that creators can quickly generate dual-image visuals. CapCut
CapCut is especially useful for social media content, where speed and aesthetic templates matter. Its AI can help match colour, align images, and offer smooth transitions.
6.2 Picsart & AI Tools
Picsart is a comprehensive editing app that integrates AI features like background removal, image enhancement, and generative tools. Wikipedia. While it’s not exclusively focused on dual image blending, you can use its layering, masking, and AI tools in tandem to build dual photo compositions.
For example, import both images into layers, mask parts with AI object detection, harmonise tone using its AI-enhancer or colour tools.
6.3 Luminar Neo
Luminar Neo is a powerful AI-based photo editor with modules like Enhance AI, Relight AI, Mask AI, and background removal, which all support advanced blending operations. Wikipedia
Though primarily a single-image editor, you can import two images, align them as layers, mask intelligently with their AI tools, and blend them with custom masks. Its strength in colour correction and seamless masking is a major asset in dual workflows.
6.4 Retouch4Me (Portrait-focused)
Retouch4Me is more specialised: it offers AI-powered plugins for professional-grade portrait retouching within Photoshop, Lightroom, or Capture One. Wikipedia. While it doesn’t inherently create dual composites, it can be used to polish portraits before blending in dual-image workflows.
For example, retouch both images first (skin, tones, cleanup), then bring them into a compositing tool and blend.
6.5 Other Notable AI Editors (Pixlr, Fotor, etc.)
Several online and desktop AI editors support features that are helpful for dual editing:
-
Pixlr (X / E): Offers AI-powered background removal, healing, and fill tools. miramuseai.net
-
Fotor: Has AI Replacer, AI Enhancer, upscaling tools, background swap, etc., miramuseai.net
-
PhotoDirector 365: Integrates generative AI, automatic fixes, and portrait tools. miramuseai.net
-
Lensa: Great for portrait retouching and quick edits, which you can then bring into your dual composition. Fotor
These tools may lack full dual editing pipelines, but they provide useful components (masking, enhancement, blending) that you can combine.
7. Workflow & Best Practices for AI‑Assisted Dual Photo Editing
Below is a step-by-step workflow with tips and best practices to get polished results.
7.1 Planning & Selecting Image Pairs
-
Choose images with some overlap or visual link: The images should share a theme (same subject, location, angle) or have matching elements (sky colour or palette).
-
Prefer similar resolution and aspect ratio: So alignment and blending become easier.
-
Decide the composition style first: side-by-side, overlay, transition, or artistic blend?
-
Visual rough sketch: It helps to sketch mask zones or blending direction (left to right, fade, wipe, etc.).
7.2 Preprocessing & Alignment
-
Resize and crop both images to the same canvas dimensions.
-
Automatic alignment: Use AI or feature-based alignment to register one image over another.
-
Manual tweak alignment: Use transform, warp, and perspective correction if needed.
-
Check for distortions: Lens distortions, vignettes or edge mismatches—correct early.
7.3 Prompting / AI Guidance & Masks
-
Start with AI-generated masks: Segment main objects (humans, buildings, sky, foliage).
-
Define blending zones: Decide which parts come from image A vs image B, vs mixed.
-
Use prompts or guidance: If the editor supports prompt-based blending (e.g. “fade building edge,” “merge sky softly”), enter instructions.
-
Trimaps / mask refinement: Expand, contract, and feather the mask boundaries where needed.
7.4 Fine Tuning, Blending, and Masking
-
Feathered blend zones: Use gradient masks or soft transition edges to hide seams.
-
Check colour exposure mismatches: Use local dodge/burn, curves adjustment, or layer blend correction to harmonise.
-
Use multiscale blending: Blend low-frequency (global tones) differently from high-frequency (textures) to reduce ghosting.
-
Handle occlusions carefully: In overlapping areas (e.g. a tree branch in one), refine the mask or use inpainting.
-
Edge cleanup: Zoom in and clean halos or mismatches manually.
7.5 Post‑Processing & Consistency Checks
-
Global colour grading / LUTs: Apply a unified colour tone or style to bring both images into a coherent look.
-
Sharpening & noise matching: Ensure textures are consistent—if one is sharper, blur slightly or sharpen the other.
-
Vignette / finishing touches: Add vignettes, light leaks, or contrast adjustments to unify.
-
Quality control: Zoom in, check edges, transitions.
-
Export high resolution: Keep layered (PSD) or high-quality composite versions for future edits.
With this workflow, you harness AI for the heavy lifting while retaining control over critical details.
8. Use Cases & Creative Ideas
Here are some ideas and contexts in which dual photo editing powered by AI shines:
8.1 Before vs After / Transformations
-
Skin retouching, restoration, or cleaning
-
Architectural or interior renovations
-
Environmental changes (seasonal, weather, time-lapse)
8.2 Portrait vs Environmental Context
-
Overlay a portrait with a background scene
-
Show a subject inside/outside, or with layered symbolism
8.3 Product Comparisons / E-commerce
-
Compare product versions or models side-by-side
-
Show usage contexts or features (open vs closed, night vs day)
8.4 Artistic Blending / Double Exposure
-
Blend faces with landscapes, textures, or abstract patterns
-
Creative transitions (face dissolves into tree branches, cityscapes)
8.5 Storytelling / Narrative Juxtaposition
-
Before & after social commentary (pollution vs clean, old vs new)
-
Contrast two moments in time or two perspectives
By combining dual editing with AI, you can produce compelling visuals that would otherwise take hours of manual compositing.
9. Limitations, Pitfalls & Ethical Considerations
AI is powerful, but not infallible. Here are limitations and cautions you should be aware Artefacts
-
and halos: Around hair, edges, complex textures, AI may produce unnatural halos or blending artefacts.
-
Over-smoothing / loss of detail: In the blending process, fine details may be smoothed away.
-
Mismatched shadows/lighting: If the two images differ too much in lighting direction, shadow behaviour can conflict.
-
Context drift: AI may “invent” content to fill gaps, leading to elements that look unnatural.
-
Model biases: AI models may misinterpret content, especially with underrepresented elements or edge cases.
-
Copyright/ownership issues: If using generative fill or AI interpolation, be careful of output ownership and licensing.
-
Ethical use: Using dual editing to mislead (e.g. in journalism, before/after claims) is problematic. Always disclose when AI is used or if comparisons are manipulated.
-
Over-reliance on automation: You should always visually check and refine—the AI is an aid, not a replacement for a critical eye.
Finally, make sure images are processed responsibly and that output reflects transparency when used in public or commercial contexts.
10. Future Directions & Emerging Research
The intersection of dual editing and AI is evolving rapidly. Some emerging directions include:
-
One-pass multi-instruction editing: Models like PromptArtisan allow users to specify multiple edits at once with precise control. arXiv
-
Region-aware dual-prompt editing: CannyEdit introduces a “dual prompt” approach (one prompt for local edits, another global) while preserving context. arXiv
-
Better inpainting and blending models: More powerful generative models that better preserve texture and avoid visual breaks.
-
Temporal / video dual blending: Extending dual editing into video, animating transitions between two video clips or images.
-
Adaptive style transfer blending: Seamlessly combine two images in different styles while preserving their core content.
-
Interactive real-time dual editing: Low-latency tools that let you drag, mask, and blend in real time, adjusting style on the fly.
As AI models grow in sophistication, dual editing will become more intuitive, precise, and artist-driven.
11. Conclusion & Recommendations
Dual photo editing with AI offers a powerful tool for visual storytellers, marketers, photographers, and creative professionals. By combining two images in a coherent, polished way, you can evoke emotion, show contrast, and communicate more in a single frame.
To make the most of it:
-
Pick tools that support alignment, masking, blending, and colour harmony
-
Use the workflow above: planning → alignment → mask & blend → fine tuning → final touches
-
Always check output manually—AI helps, but human discernment is irreplaceable
-
Experiment with prompts, blending styles, and creative juxtapositions
-
Stay ethical and transparent when representing transformations or comparisons
If you are starting, try a pair of images (simple scenes, similar lighting), experiment in CapCut or Picsart, and gradually take on more complex pairs.
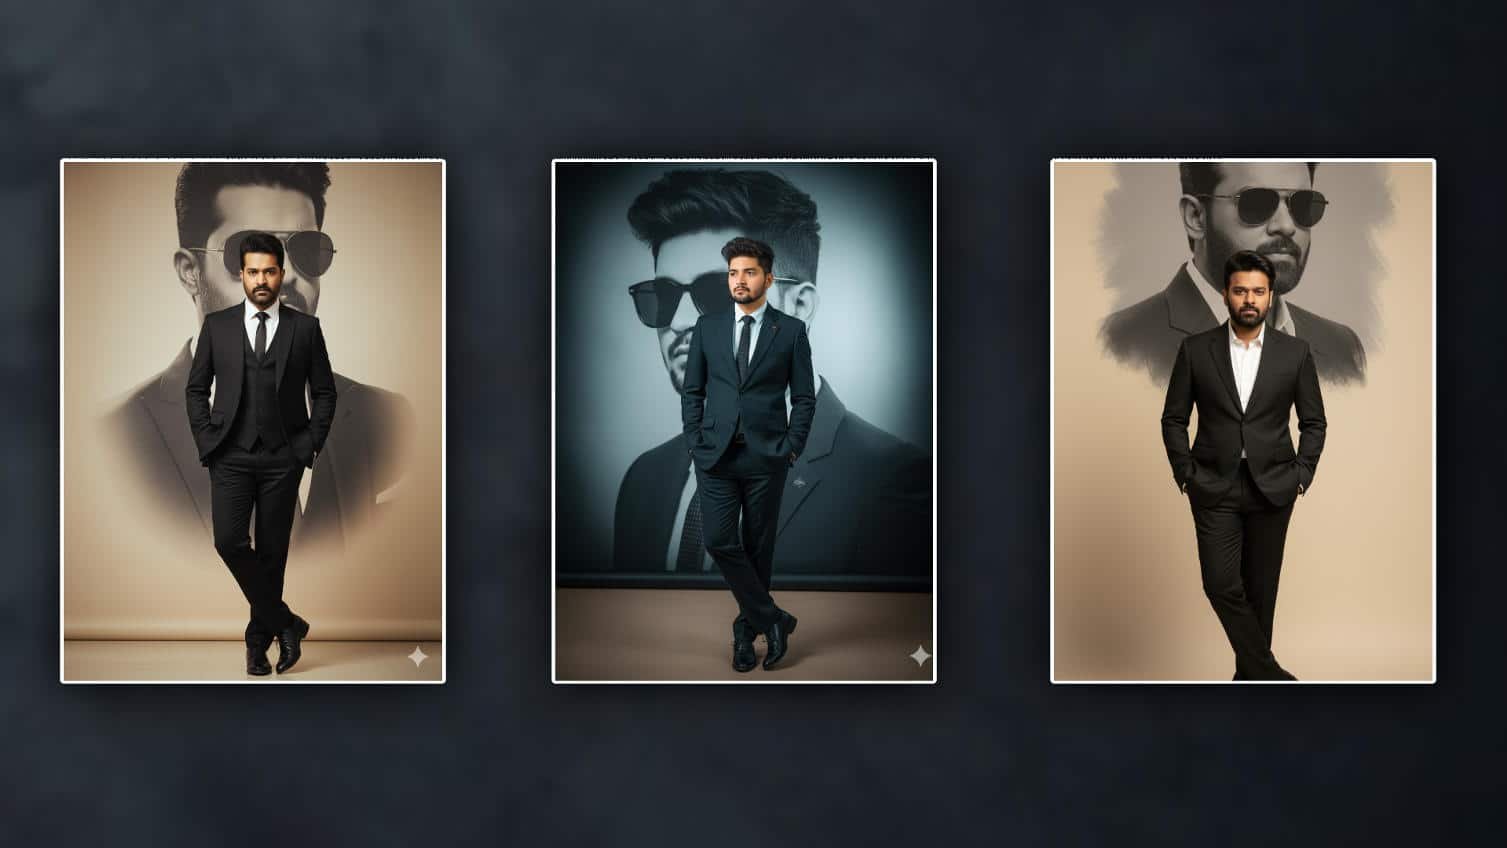
PROMPT HERE
Generate Realistic A well-groomed man wearing a tailored dark black suit, white dress shirt, and black leather shoes. He is standing confidently with his hands in his pockets and one leg crossed over the other.
The background is a large
grayscale artistic portrait of the same man wearing sunglasses, with high contrast and soft
vignette edges. The overall
aesthetic is professional, stylish
and modern, with a studio lighting
effect and a clean beige backdrop
100% accurate original face should appear in the photo I uploaded