If you are looking for a video with beautiful text to say advance wishes then this article is for you, in this article, I will show you step by step how to create an advance wishes video without adding any photos.
What do you need to edit this video?
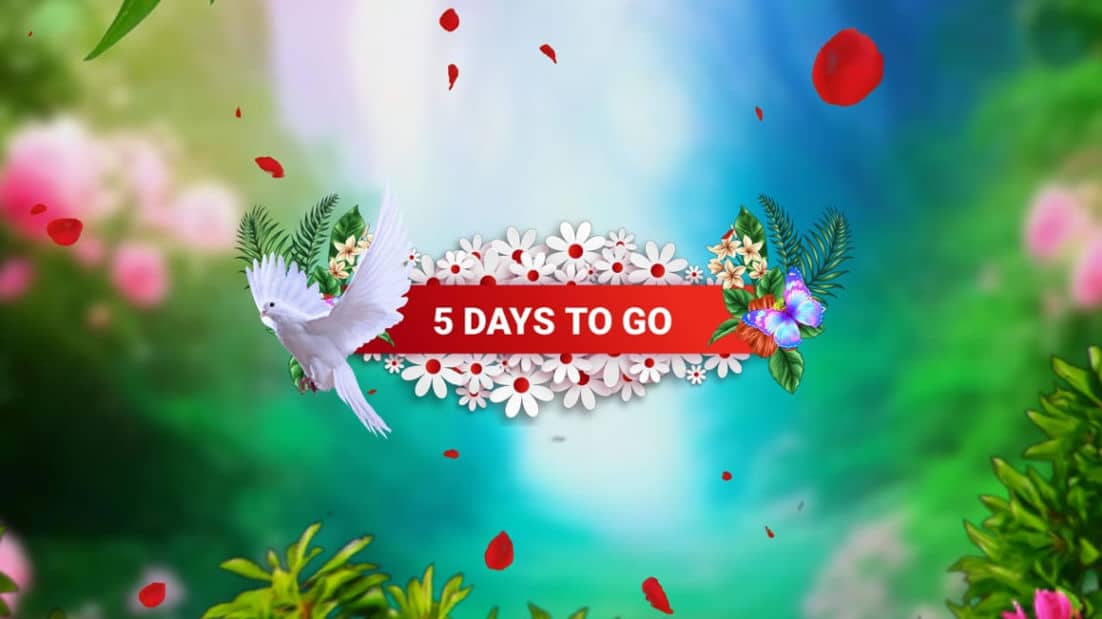
- A nature colorful background photo,
- Some family flower and leaves tree PNG images,
- Text background board,
- Butterfly animation video,
- Pigeon PNG image.
- Red Rose Leaves animation video,
- You must have the Alight Motion app installed on your mobile,
- First,, you open the Alight Motion application on your mobile click on the plus icon in green color and enter the project name select the 9:16 ratio set the resolution to 1080p set the frame rate to 30fps, and click on Create Project Now the interface of elite motion will open.

- First, you need to click on the plus icon (+) in green color click on the media option add a colorful background photo, and set this layer for four seconds.

- Now click on this layer click on the effects option click on add effect and add the Gaussian blur effect.

- Then click on the rotate option and rotate the photo up to 90 degrees Now fit the photo to the screen and increase the size more.

- Also, select this photo click on the move and transform option, and set the ‘Z’ axis to 6500

- Now click on the plus (+) icon click on the media option and add a text board PNG image from your gallery also rotate this image horizontally now click on this image layer and set it for four seconds then click on this image and move and click on transform option and click on ‘Z’ axis and set 6000.

- Now butterfly effect should also be added to this board for this effect click on the plus icon click on the media option and add the butterfly animation video after adding click on this video click on the apex option click on the add effect and add the chroma key effect Open the effect and select the color block, remove the entire background, duplicate it and adjust both sides.

- Also, for this layer, the ‘Z’ axis should be set at 6000 and then these layers should also be added for four seconds.

- Now add another pigeon PNG image by clicking on the plus icon clicking on media clicking on this image layer and setting the ‘Z’ axis to 5000 for this to animate this image use the move and transform option from right to left.

- Now add the rest of the flowers and leaves PNG images one by one and set them on the ‘Z’ axis from high to low i.e. decreasing by 1000 for each layer and adjusting all these layers from left to right at the bottom.

- Then take a text on the text board, whatever you want to write, take that text, click on that text layer, and here also take ‘Z’ axis 6000, now this text should be set right in the middle of the text board, set it in white color and align it vertically in the middle.

- Now you need to add a camera layer on top of the captured layer. For this click on the plus icon click on the elements option and select the camera option Now add this camera layer for four seconds.

- Now click on the camera layer option and click on the move and transform option You have to animate this slide Now the first side is complete All the other slides should be created in the same way, but if you edit using the same process, you will waste a lot of time, so if you want to edit instead of wasting time.

- You can also copy all the layers in the slide and paste them to the next layer and edit only the text in them, and you can edit the complete video from 30 to 60 seconds.

- When you add a text, you can write a quote related to any birthday.
- You have to copy the camera layer as taken in the beginning paste the camera in each slide and animate it, but when you add this camera you have to animate it using the options related to the camera.

- You can also use the group option instead of the camera to edit. You need to use this group option instead of copying and pasting it and taking it one time for each slide.
- Apply the group option to the first slide, click on the plus icon click on the elements option, and select the null option, add this null option to the four-second lover select all the other layers one by one, and click on the layer option at the top of the right side. Select the null one and connect each layer to the null one. When applying null to the second slide, after adding nulls, set the number as 1,2,3,4,5,6.

- Finally, add background music to this and set this music to fade in fade out, and click on the share option.
- Click on the video format set it to 1080p and set H.264 in the codec
- Keep the frame rate at 30fps and select the full option, then click on the export option and export then you are ended

- When editing a video, you need to make sure that the files, images, and elements of the video are as high quality as possible. After playing the video frame-wise, you have to check the time duration of all the transition effects completely. By correcting all these small corrections, you can edit the video in high quality with a professional look to your video. If you want, you can use any effects or images. You can also edit the video attractively.
- You can select the ratio that is convenient for you in this video ratio 16:9 or 9:16 for reels, but you have to select full screen before editing the video you go to the settings in the alight motion application and make all some settings by default including six in the layer setting Set to seconds or four seconds Photos or videos layers duration should also be set because you can make video editing easy and fast while editing video After the video is complete you can export the video or even share the project and share the link.