Are you looking for a beautiful advanced birthday video editing, then in this article I will explain to you step by step how to create a coming soon or advanced birthday video. It will be exciting and easy.
Now let’s find out what you need to edit this video.
- Cinematic background video with particle effects.
- Stylish English font.
- Red steel texture image.
Now let’s start editing the video using these.
- We use many software to edit such videos, but not everyone may have computers and software. I will tell you how to create a professional cinematic-level Happy Birthday Wishes video in only the mobile application, that too in the aAlightMotion application. It will be straightforward to edit or even add your name. You can also add your photos and take the video editing to the next level.
- First, you need to add a background image. Before this, you need to open the Alight Motion application, select the 9:16 ratio, set the resolution to 1080p, enter the project name, and set the background to a black screen. Also, set the frame rate to 30 fps. Now click on the Create option at the bottom, and the interface will open.
1) Using Background Video
- Click on the green plus icon, click on the Media option, select the cinematic background footage video from your gallery, and add it. Now add that video for 6 seconds or until the beat of the music is set in that music, or you can add it completely from 20 seconds to 30 seconds.
- To make color corrections to this video, click on the video layer, click on the Effects option, and search in Apex. You can do color grading with this option by selecting the effects called Saturation. Then come back and now here you have to set the beat marks while listening to the music. For this, if you click on the top and hold, a beat mark will be added. You have to set all the beat marks like this. Add text inside these beat marks
2) Text Adding
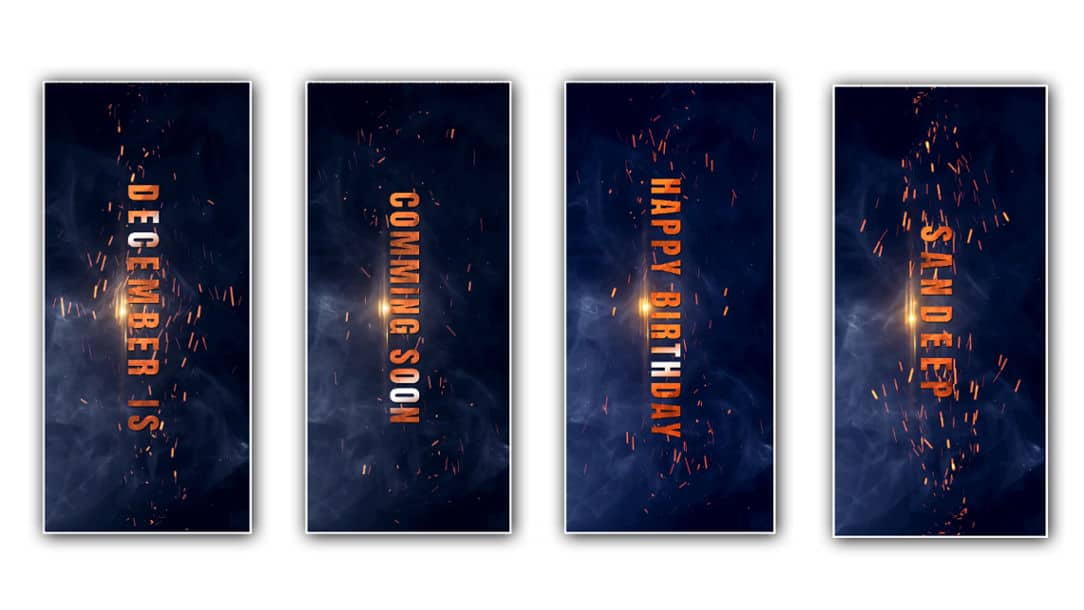
- Now add a text for this you need to bring the cursor to the starting point and click on the green plus button on the bottom right side and click on the text option and take a text example here you need to take the month name of your birthday like November or December and write Is next to it and enter it in the next slide called Coming Soon After adding the text like this add eText in the middle of the weight mark you said and delete the extra Now click on this text layer and click on the Edit any text option and you can also apply the font style of your choice then you can also add the colors of your choice or for a cinematic look, you can also use the red color sheet metal sheet For this you need to click on the text option and click on the color and feel option on the right side or on the left side and click on the media option Click and select that image from your gallery and add it. This image will be converted into the text you took.
- This is how a text will be ready. Now, to make a cinematic animation for this technique, click on the text layer option you took and click on the Move and Transfer option on the left side. Here, there will be a Move option and a Scale option. Of these, you only need to select the Scale option. Click on the Starting Point and set it to Zoom. After reaching 0.3 seconds, set it to Zoom In. After reaching the end, set it to a little smaller. By doing this, a cinematic animation will appear.
- Now, you also need to apply a blur effect to it. For this, click on the text option here. Then click on the Effects option and click on the Add Effect option. From the Apex Store, you need to select the Gas or Motion Blur effect. Only the standard settings should be used in this. Using this effect, you can apply motion blur to text that is zoomed in at the start, giving it a cinematic look.
- After the first slide is complete, you can write a quote for the second flight or any other purpose. For this, you can copy the slide you took in the beginning and paste it at the next beat mark and click on the edit text and you can reply to it. You can also add your name to it and you can make the animation. After editing it completely, finally, you should finally play the video completely from the beginning to the end and check it because if there is any mistake or animation mistake, you can set it there and then, you will get a professional look along with the timing. Then click on the share option select high quality and set the framerate as high as possible and click on the export option. After exporting, the save option will appear. You can click on the save option and save this video to your gallery.
💠Photos and Videos Click Here
💠XML Files Click Here
💠Music Click Here
💠Alight Motion Presset Click Here